Buyer’s Guide: Ice Axes and Ice Tools

So, you’ve decided to get into winter mountaineering. Forget that you’d benefit exponentially more from snowshoes, trekking poles, a softshell, goggles, a pair of mittens or myriad other essentials – it’s time to get sexy with it. There’s no faster way to decorate your pack and impress your friends than purchasing an ice ax.

Choosing your ideal ax can be daunting. They come in many different shapes, sizes and, most importantly, colors. Depending on the kind of climbing you plan to pursue, do you need a traditional piolet, all-around ice tools, wickedly curved mixed tools, or a highly specialized hybrid? The answer is almost assuredly some sort of combination. It took me three years and a few wasted Benjamins to arrive at my ideal quiver, and now that I have a decent grasp on the ins and outs of the ice ax market, here’s a gentle rundown of what’s out there.

The Traditional Piolet

d1efc-onecol

Characterized by a long, straight shaft and a pick with a positive curve (envision a rainbow), piolets are the old guard of the ice ax world. Almost everyone owns one, whether you’re Noob McSelfie or Ueli Steck. Excepting steep, technical routes, this is all you need for winter/spring 14ers, the standard routes on most Pacific Northwest volcanoes, El Pico de Orizaba, the West Buttress of Denali and so on. If you’re reading this because you’re in search of your first ice ax, you likely need a piolet. I believe that’s French for backpack ornament.

Of course, it’s not that simple. Every brand brings something a little different to the table. They range in size from 50cm to upwards of 75cm. Some have a hammer, some have an adze. A few have rubber grips and pinky rests. What exactly is all that used for, and what do you need?

Let’s start with size. When holding a piolet in self-arrest grip (read Freedom of the Hills or take a class), you should just be able to touch your ankle bone with the spike. If you’re torn between two different sizes, I recommend going shorter. A trekking pole is a better option in most situations where you’d want a longer ax, and shorter shafts are easier to wield on steep terrain.

Keep your piolet as simple as possible. Rubber grips, pinky rests and bent shafts are best kept on technical tools and hybrids. These other options, which I’ll dive into next, will also likely have a hammer. For that reason, I suggest getting a classical ax with an adze.

Most outdoor retailers will carry three or four different brands of straight-shafted piolets. The truth is, other than what color matches your pack the best, there’s not much difference. Hold them in your hand, swing them around, decided how much you’re willing to spend and pick whichever tugs at your heart strings.

The All-Around Ice Tool

3fef2-3000s-x-all-mountain-14

The three big differences between an ice tool and a piolet are a curved shaft, a radically shorter length and a pick with a reverse curve (imagine, well, an upside-down rainbow). Don’t let the “all-around” title confuse you; these are meant for ice climbing. They can perform the functions of a traditional mountaineering ax in a pinch, but nowhere near as effectively. Trying to self-belay or self-arrest with an ice tool is expert-only stuff.

You should buy a pair of all-around tools if you want to (duh) go ice climbing, or a single all-around tool to pair with a piolet or a hybrid if you see semi-technical routes in your future. Comfort levels vary from climber to climber, but once a slope angle noses over 50-55 degrees, I prefer to have a second tool in addition to my piolet. One piolet/hybrid and one ice tool is the system of choice for classic routes such as the Kautz Glacier or Liberty Ridge on Mt. Rainier, the Adams Glacier on Mt. Adams, the East Slope of Mt. Bross and so on.

The reverse-curved pick is super grippy, even if only plunged into ice a few millimeters. The downside is this stickiness also applies when trying to self-arrest. If your technique is off, the tool is likely to get ripped out of your hands and become a flailing projectile hungry for puncture wounds.

As mentioned above, I strongly suggest ice tools with hammers. An adze is dangerous on ice or mixed routes, where a popped tool’s most likely landing place is your upper lip. Hitting yourself in the face with a hammer might be unpleasant, but hitting yourself in the face with a glorified knife is a hospital visit and a significant other who might never look at you with the same lustful gaze. In situations where an adze might be desirable, which are rare to begin with, you’re likely going to have a hybrid or a piolet along as well.

The best advice I can give for purchasing ice tools is to demo as many as possible before investing. The weight, swing angle and grip can wildly differ between tools that look more or less the same. Figure out your preferences before being stuck with a $500 pair that, to you, feels like swinging wooden clubs coated in bacon fat.

The Mixed Tool

7aa67-00e6a5a4-2585-4a8f-8c6f-dd8ca8ea8189

Welcome to the second-briefest entry in this blog post. A mixed tool is an all-around tool on steroids. The curves on the shaft and pick are more wicked, the handles are beefier and the people that use them effectively are the demi-gods of the climbing world. If you’ve read this far, you probably don’t want or need mixed tools. These are used for scraping up blank rock faces with the occasional smear or pillar of ice. Most lack both an adze and a hammer for the face- and relationship-destroying reasons discussed above.

The Hybrid Tool

a6971-adz

I’ve used the term “hybrid ax” about a half-dozen times now, and they’re the most confusing category in the modern ice-ax market. In general, they are a cross between a piolet and an all-around ice tool. Gear companies have the freedom to be creative here. The design elements and included features vary considerably from brand to brand, and not all hybrid tools are created equal.

Speaking generally, a hybrid tool is shorter than a traditional piolet, has a slightly bent shaft and includes some sort of feature that makes it easier to swing like an ice tool, such as a rubber grip or a pinky rest. They come both with positive- and negative-curved picks, with some brands allowing for these to be interchangeable. Because hybrids are meant for more experienced climbers with developed preferences, I’ll leave the adze vs. hammer and positive vs. negative curve decisions up to you. I personally like my hybrid tools with an adze and a positive pick.

These are best for routes where you’ll be spending a lot of time on steep terrain and most people would prefer two ice tools, but there’s also a long easy-angled approach. Think glaciers. A hybrid won’t arrest, plunge or act as a cane as well as a piolet. It also won’t climb steep ice as well as an ice tool. What it does do is provide a bridge over the gap when you can’t decide which of those others to bring.

Hybrid tools carry more street cred than a traditional piolet and benefit from slick marketing campaigns, meaning many beginners skip straight to them. That’s fine, especially if you see yourself quickly moving into more technical routes, but understand that hybrids are generally much heavier and more expensive than a piolet.

My preferred system for AI2-3 glacier routes or very steep (55+ degree) snow routes is a medium-length (57-62cm) hybrid paired with an all-around ice tool. If I’m doing a more traditional snow climb, I save weight and bring my piolet at the expense of not impressing as many trailmates.

The Red-Headed Stepchildren

c82c0-ee40f0e8-1fa6-4559-81d7-b758c3663fcf

Innovation is required to stay at the forefront of the outdoor industry. There are many piolets and ice tools that don’t fit into any of the above categories. I’m looking at you, Grivel. CAMP USA also makes several featherweight options designed for ski mountaineering, adventure racing and high-altitude. Once again, if you’re in the market for one of these specialized tools, you probably quit reading about 1,000 words ago.

For the record, my quiver:

  • 65cm Black Diamond Raven (piolet)
  • 52cm Petzl Sum’tec (hybrid w/ adze)
  • 50cm Cassin X-All Mountain x2 (ice tools)

Happy hunting.

Advertisement

Top 5 Colorado Mountain Towns (for Dirtbag Climbers)

One of the biggest perks of pursuing 14ers and 13ers is having an excuse to range far and wide across Colorado. Little towns that even natives haven’t heard of become favorite haunts, complete with their hole-in-the-wall restaurants, obscure festivals, historic sites, quirky attractions, sunny patios and small-batch breweries. When you exit ski country, you enter the real Colorado.

I’m daunted by even the thought of trying to tally how many road miles I’ve logged in-state over the past four years. Hiking and climbing nearly every weekend, let’s just say I’ve gotten to know Colorado fairly well. The only criteria I have for the following list is the question, “Which towns do I look forward to visiting, time and again, even as much as the surrounding summits?” This mostly boils down to mountain access, nearby free camping areas and quality of local restaurants and breweries.

1. Ouray

7428f-66826_10100461552801686_1473575404_n

The undisputed champ. Any ranking of Colorado mountain towns that doesn’t start with Ouray is invalid. It has the world-famous Ouray Ice Park; access to the most beautiful mountains in the state, including the 14er Mt. Sneffels; several hot springs; affordable lodging and tons of camping; a smorgasboard of charming coffee shops and restaurants; and my second-favorite brewery in Colorado. For those of you exclaiming how much you also love the Ouray Brewery — pipe down. That place is serviceable, but the Ourayle Brewery, also known as the Mr. Grumpy Pants Brewery, blows it out of the water. The fact that most people go to Ouray Brewery and overlook Ourayle just adds to its allure. Ourayle has what I’d argue is the best atmosphere of any bar in the state — as long as you can appreciate sarcasm and take a joke. Also, don’t be a Beermadonna. Other awesome establishments include O’Brien’s, Backstreet Bistro, Mouse’s Chocolates & Coffee and Goldbelt Bar & Grill.

2. Durango

98309-ska2bbrewery

I placed Durango here largely because of its size. It’s a mountain town big enough that the average city-dweller would feel comfortable living there, at least for a year or two. It has all the amenities, a large regional airport, raucous nightlife and enough climbing to occupy several lifetimes. It’s also the basecamp for most everyone venturing into the recesses of the Weminuche, Colorado’s best wilderness area. I mentioned Ourayle as my second-favorite brewery, and the only one to top it — Ska Brewing — resides in Durango. Steamworks also has great beer in addition to some of the best pub food I’ve ever tasted. A trio of top-notch outdoor shops, dueling sushi restaurants, a hidden used bookstore and a variety of watering holes solidify Durango’s ranking.

3. Buena Vista/Salida

cac9f-salida

I know, I know, they’re technically two separate towns. From a climber’s perspective, they’re one and the same. The surrounding Sawatch Mountains are regarded by most hikers as boring lumps of talus, but there are a lot of them, and the towns at their foot are a dirtbag’s dream. There’s so much dispersed camping in the area I find a new spot nearly every time I visit. The presence of Elevation Beer Co., Eddyline Brewing and the Boathouse Cantina make choosing an apres-climb stop difficult. Best of all, this area is only two hours from Denver. These are the two mountain towns I find myself in most often, and you won’t catch me complaining.

4. Lake City

cd4ca-205840_816339861616_2308209_n

This town could be described as Ouray’s little brother, and that’s not a bad thing. What Lake City lacks in size and amenities, it more than makes up for in character. This town has a fledgling ice park complete with an annual Ice Festival the first weekend of February. It’s one of the highlights of my winter. Whereas the Ouray Ice Festival is a bit of a spectacle, the Lake City Ice Festival is a grassroots gathering of the tribe for beginners and crushers alike. Though Lake City tends to be overrun with Texans in the summer, it’s worth wading through the sea of ATVs for access to many of the state’s best high peaks. There’s limitless free camping in the area, and even a hostel for the dirtbag with delicate sensibilities. Must-stop establishments include Poker Alice and Packer Saloon.

5. Silver Cliff/Westcliffe

51aa0-westcliffe

These sister-towns are the gateway to the east side of the Sange de Cristo Range. There honestly aren’t many notable attractions within the city limits, but the views are breathtaking, the amount of nearby trailheads is nearly overwhelming and Tony’s Mountain Pizza has the best pies I’ve yet to find in Colorado. You could literally spend weeks in this area camping for free, hiking a quality 13er or 14er every day and refueling with a different pizza every night. Once someone opens a brewery here, it’s game over, man. Anyone want to throw in with me?

Notable omissions, with reasoning:

Estes Park: Flooded with tourists, lack of free dispersed camping areas, fee required to enter Rocky Mountain National Park, only one (overloved) 14er and you have to go through Boulder to get there.

Aspen: Unless you have a trust fund…

Silverton/Telluride: Proximity to Ouray and Durango. I didn’t want this to turn into a list of only mountain towns in the San Juans, which would be pretty easy. I regard both Silverton and Telluride as highly as the other Southwest Colorado entries.

Pagosa Springs: If only Pagosa had more nearby 13ers/14ers, it wouldn’t just be on the list — it would be near the top. It’s a fantastic town on the borders of both the Weminuche and South San Juan wilderness areas.

Alamosa: It’s the biggest settlement on the west side of the Sangres, but shockingly, you just don’t go through it that often in the pursuit of summits. San Luis Valley Brewing Co. is a treat during the rare visit.

Leadville: No brewery, a kind of depressing vibe and only two passable restaurants (High Mountain Pies and Tennessee Pass Cafe). Turquoise Lake is a worthwhile weekend destination, though.

10 Things You Need to Know for Hiking in the Snow

Most Coloradans consider “14er season” to be June through September, but such a viewpoint is severely restrictive. The fall, winter and spring months are often the most rewarding times of year in the high country. There’s nothing quite like having a popular summit such as Quandary Peak to yourself, looking out over a sea of white-capped mountains as you sip hot tea that warms your body from the inside out. Like many novice mountaineers, a few short years ago I viewed the gap between summer and winter climbing as insurmountable. I had too many questions, and the answers were too hard to find. The truth is, like many things in life, it really doesn’t have to be that difficult.

04c45-462918_969360052926_978220388_o

1. An introduction to winter layering

This was one of the most confusing aspects to me when I was starting out. Hard shell or soft shell? Down or synthetic? How many layers do I need to carry? This stuff isn’t cheap, and with my limited disposable income, making the right choices was crucial. Everyone has their own system. I’ll offer mine as a guide, along with the reasoning and a more general perspective.

  • Polyester/spandex short-sleeve T-shirt: Avoid anything with cotton. I don’t like long sleeves here because it’s uncomfortable when you’re layering other pieces on top, which are almost all long-sleeve as well. If you do opt for long sleeves, find a baselayer with thumb loops to help keep them in place.
  • Fleece 1/4-zip pullover: This is my outer layer most of the time in winter. A simple T-shirt and a fleece gets it done when I’m moving, even in frigid temperatures. The other stuff piles on only on the windiest, coldest days, or when there’s precipitation.
  • Midweight synthetic pullover: Down would be fine here as well, but I prefer synthetic because it might get a little sweaty if you’re working hard. Synthetic insulation stays warm even when wet. I leave this one behind to save weight when the forecast is warm and dry.
  • Soft shell jacket with hood: Hard shells are fine too, but soft shells are generally more breathable. A cheap hard shell is often like wearing a garbage bag, and you want to avoid sweating as much as possible in the winter. Soft shells hold up just fine in Colorado’s dry snow.
  • Down over-it-all puffy with hood: Wearing a down jacket over a shell seems kind of weird, right? It’s not. I promise. This is the jacket that will stay at the bottom of your pack 95 percent of the time, but will become your best friend during long rest breaks, on summits or in an emergency situation. Don’t skimp. Again, synthetic works fine, but in general down is warmer, lighter and more compressible.

a8b1e-1025614_10100441826049256_1814084975_o

2. Basic avalanche education is free

Several local organizations, such as Friends of Berthoud Pass, offer free one- or two-hour avalanche awareness seminars. A proper AIARE Avalanche 1 course wouldn’t be a bad idea, but as a hiker the most crucial piece of your avalanche training is learning what terrain to avoid altogether. Don’t go out in the winter without at least attending one of these free classes, and reading one or both of Snow Sense and Staying Alive in Avalanche Terrain. I highly recommend Mountain Rescue Aspen’s Public Avalanche Seminar, which is held every year in January. For just $30 you get a three-hour lecture followed by an on-snow day practicing terrain recognition, beacon searches and more. Can’t beat that.

3. Winter is ridge season, spring is couloir season

People often equate winter with ice axes and crampons. Most of the time, that’s simply not true. You’re far more likely to use snowshoes and trekking poles than technical gear. Ascending wind-swept ridgelines keeps you out of avalanche terrain. Just look out for cornices and make sure there’s terra firma under your feet. Snow-climbing season typically begins in April or May, when it’s finally time to bust out the ice ax and crampons for those tasty couloirs. MICROspikes are likely all the traction you’ll need in winter, and snowshoes with a heel-lift and built-in crampons are the way to go for steep ascents.

61abb-301797_10100101457021516_217102009_n

4. OpenSnow.com and the CAIC are your friends

Check these two sites daily, even if you’re not planning on heading out. It’s incredibly beneficial to your overall education and awareness. OpenSnow.com meteorologist Joel Gratz provides spot-on weather forecasts, and the Colorado Avalanche Information Center posts updates daily on avalanche conditions.

5. Water freezes

No duh, right? It’s shocking how often someone will be stuck four miles from the trailhead with a solid chunk of ice as their water supply. This is easily avoidable. For starters, leave the hydration bladders at home. Water will almost always freeze in the thin hose and block your access, even if you have an insulator sleeve. I give this advice often, and inevitably someone will respond by championing the incredible lengths they go through to use a bladder and hose year-round. I’m not saying that it won’t work on some days, or even most days. It just won’t work on all days. At some point, it’ll be too cold or too windy or you’ll forget to clear the hose, and you’ll be screwed. All that effort is an incredible pain in the ass, anyway. I prefer to keep a Nalgene, turned upside down, in an insulated koozie clipped to my pack’s hip belt for easy access. My other water bottles are in my pack, wrapped in extra layers and pushed against my back for the additional body heat. A bit of electrolyte powder also protects against freezing.

6. Pluck the low-hanging fruit

Many of the same 14ers that are considered easy in August are still considered easy in January. Mt. Elbert, Mt. Sherman, Quandary Peak and Mt. Bierstadt don’t require much more mileage or elevation gain than they do in the summer, and there are virtually avalanche-safe routes on each. Search the 14ers.com Trip Reports section for your intended mountain, and click only the checkboxes for the winter months. There are dozens of quality write-ups on the easier peaks in December, January, February and March.

7404c-860711_10100357393378006_30766061_o

7. You don’t need $500 mountaineering boots

Sure, they’re yellow or orange or some other fancy color, and they make you feel like a badass. They’re also overkill for winter hikes and surprisingly not all that warm. Run-of-the-mill winter hiking boots are cheaper, lighter, warmer and more comfortable. As long as they have insulation and come up to your ankle or above, you’re golden. Such boots are even compatible with strap-on crampons. The big caveat is that you’ll want at least a heel welt, and likely both a heel welt and a toe welt, if you plan to try climbing ice. Those are for attaching hybrid or step-in crampons, which are more secure. Expensive mountaineering boots are also more rigid, saving your calf muscles while standing on steep snow or vertical ice.

8. The “Other” Four Essentials

The 10 Essentials list is even more important in winter, when the stakes are higher. I’d like to add four more: a thermos, a multiclava, goggles and mittens. The thermos might be a luxury, but there’s nothing better than hot soup or tea on a cold, windy day. I often joke that a thermos is the best gear purchase I’ve ever made. A multiclava is a close runner-up. These little pieces of fabric have myriad uses, including as a facemask. You need to be able to cover every inch of exposed skin in the winter to prevent frostnip or frostbite. That’s where the goggles come in, too. You need to see even if it’s windy and dumping snow. No need to break the bank here, a simple $20-30 pair will suffice. Finally, buy a good pair of mittens. Even the nicest gloves can’t compare to mittens for warmth. I recommend Black Diamond Mercury Mitts to anyone who will listen.

a7dc2-920328_10100393800113616_1345569293_o

9. The sun is your enemy

OK, not really. The warmth of the sun feels pretty damn good in the winter. It’s just doubly important to have proper sunglasses and apply SPF30+ sunscreen every two hours. The sun reflecting off the snow is lethal. If you don’t take the steps to protect yourself, you’re in for a world of pain. I’m speaking from experience. Pack sunglasses that cover your full field of vision — glacier glasses are best, and they’re really not that expensive. Keep sunscreen easily accessible, such as in your pants pocket, to limit the excuses against applying it regularly.

10. Carry enough to survive a night out

Like a layering system, this will vary depending on a person’s risk tolerance, attitude and experience. The key is being confident in your ability to live through a night in the open. For some that means a tent and a sleeping bag, for others a bivy sack, and for still others simply extra layers. I fall into the latter category. It would be far from comfortable, but I trust my down puffy and other layers to get me through a winter night. I also carry a tarp to wrap myself in should I need protection from the elements.

Getting the Band Back Together (Marble Mountain)
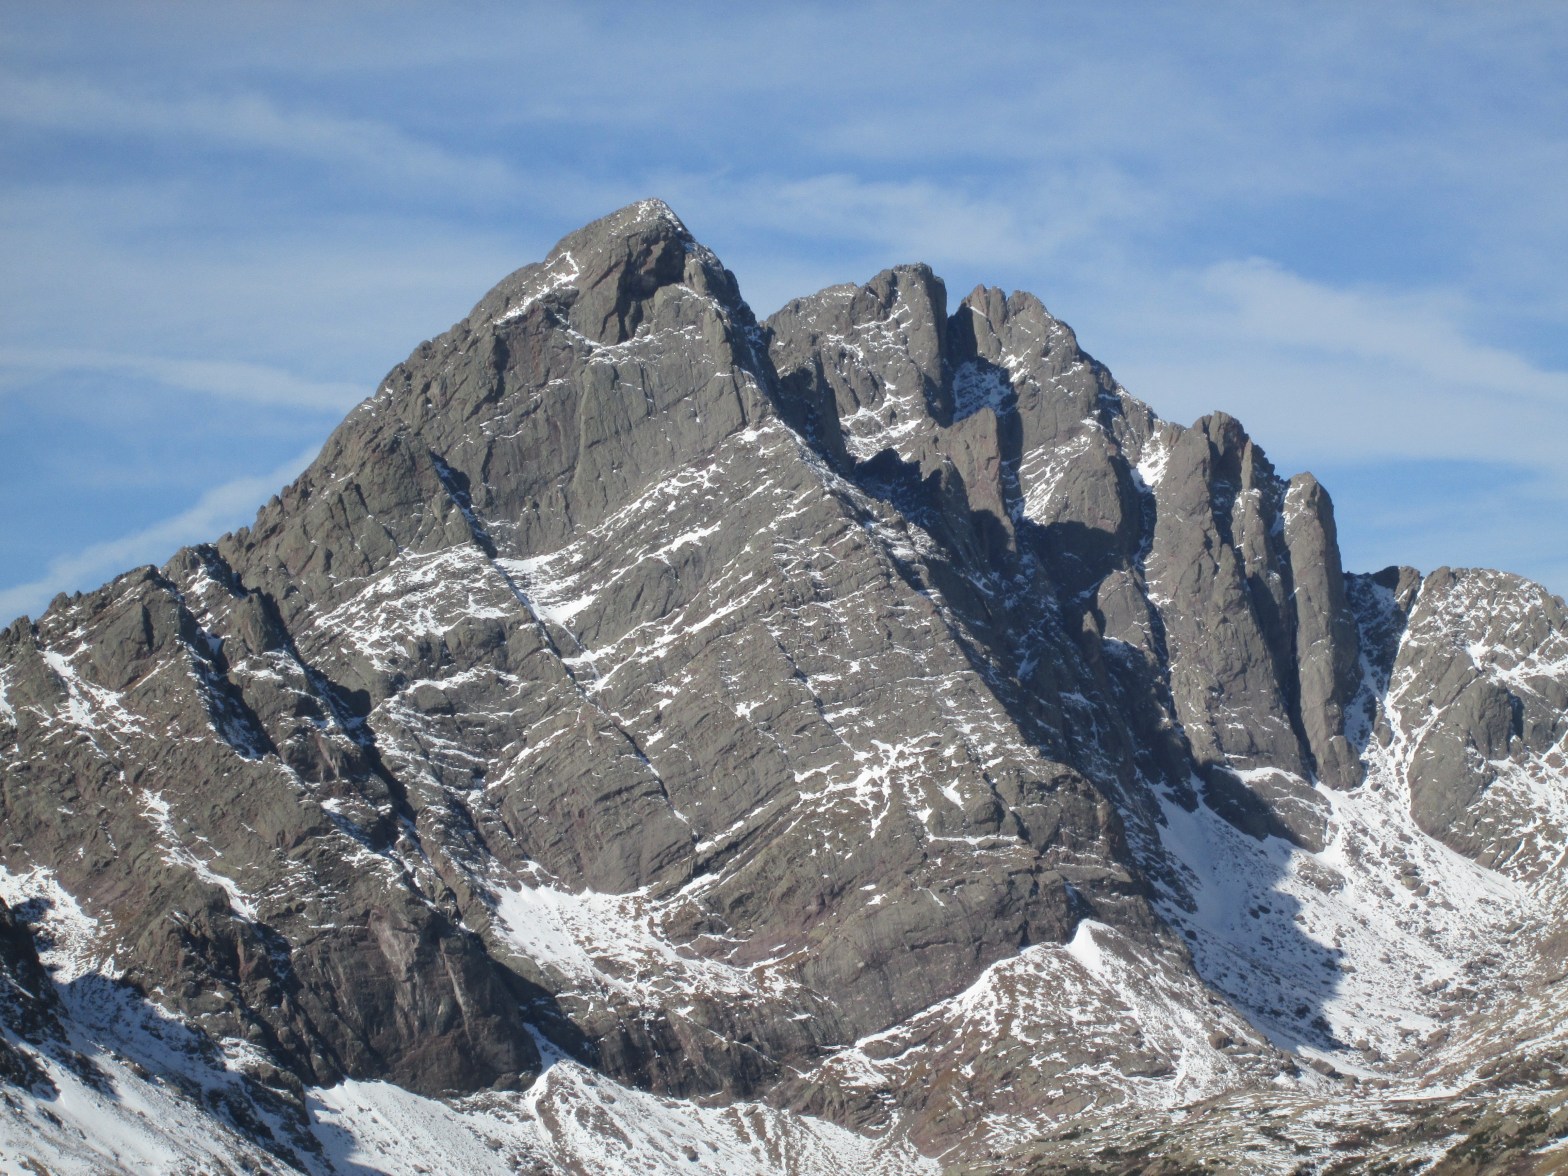
Marble Mountain (13,266′)

ROUTE: East Ridge
RT DISTANCE: ~7 miles
RT GAIN: ~3,500′
RT TIME: ~7.5 hours
CLIMBER(S): Dan McCool, Ben Shulman, Jeff Golden

I’ve always held the belief that the people with whom you share the trail are the best part about hiking. Lifelong bonds are made in the hills. The common goals, the shared risks, the glorious successes and the crushing defeats — mountaineering pulls us together in a truly profound way.

I’ve formed one of those lifelong bonds with Dan. Ben, too, but we used to live together so I’ve had my fill. Though our priorities have shifted and we’re no longer able to meet in the mountains nearly every weekend, when we get together it’s always as if nothing has changed. That goes for most of the folks I regularly hiked with in 2011-2012 while we all raced toward the 14er finish line. Unfortunately, as it often does, life has taken us in different directions.

When the idea materialized of a reunion hike on Marble Mountain, I knew it was something not to be missed. Prior commitments and injuries got in the way of it being fully attended, but still, getting out with Ben and Dan is about as perfect a day in the mountains as a man can reasonably expect. It’s guaranteed to be a memorable outing.

We arrived at the Rainbow Trail/South Colony Lakes Road junction late Friday night after a necessary pitstop at Phantom Canyon Brewery. Terrified of the swarms of ATV-riding Bubbas in camouflage, Dan and I opted to sleep in the back of his truck. Ben, the bravest of our trio, pitched his bivy sack off to the side of the road. Expecting an easy day, we decided on a gentlemanly start of 7:30 a.m.

The morning began with a short jaunt in the wrong (…but right…) direction on the Rainbow Trail. It’s an odd feeling walking away from the mountain you’re trying to summit. Luckily it’s less than ¼-mile before you take a right onto a climber’s trail and start hiking up Marble’s East Ridge.

The trail is strong in places, and impossible to follow in others. The line is pretty obvious, however; as long as you’re hiking upward and staying near the ridge crest, you can’t go wrong. Good thing, too, as a heinous amount of deadfall had us weaving every which way. We were sporting dozens of new nicks and cuts by the time we finally emerged from treeline. Oh well. Bushwhacking builds character.

3e5f7-15675_2_l

Snow was unavoidable for a couple hundred feet after treeline, about six inches over slick tundra and wet rocks. This was the most tedious part of the route. Higher on the ridge the wind had blown it mostly clear, and in many ways it was reminiscent of summer. Dry tundra, T-shirts, sweat and size 14 boys jorts.

The walk to the summit probably took an hour longer than it should have thanks to the copious amount of Crestones photos that needed to be taken. Marble is a benevolent lump of tundra, requiring only a very minor false summit before the ridge ends in the true highpoint. After drooling over the Crestones all morning, we were pleasantly surprised to see that the views in the other directions were just as breathtaking.

82cf8-15675_6_l

03957-15675_4_l

It was cool to see Dan reach the top. He hadn’t been on a high-altitude summit hike in nearly a year, and he wore a child-like expression of wonder on his face. It was a great reminder not to take these adventures for granted. Going out most weekends, it’s easy to lose perspective on what drew us to the hills in the first place. Dan’s awe and joy after a lengthy time away were palpable.

We lounged on the summit for about an hour, drinking a couple beers and watching a storm roll in over Kit Carson and the Crestones. If possible, the clouds made the Sangres even more beautiful.

ac0ea-15675_15_l

628af-15675_16_l

We started down the deceptively long ridge just as the first flurries were starting to fly. We stayed well ahead of the full brunt of the storm. Regardless, it was simply a tundra stroll back to treeline and the trail. Many stops were again necessary for even more photos of the Crestones.

With a light mist falling back at the truck, we decided to delay our planned post-hike beers until back in Westcliffe. South Colony Road was much rougher than I remembered, but we made it safely down the 2.5 miles to the 2WD trailhead without incident. We got to-go pizzas from Tony’s (the Western is the best BBQ chicken pizza I’ve ever had) and popped open our beers at an undisclosed and probably illegal location with great views of the Sangres. Great ending to a much-needed jaunt with old friends!

51aa0-westcliffe

A Winter Preview on Quandary’s West Ridge

Quandary Peak: West Ridge (Fall 2014)

Saturday was one of those times everything just comes together.

As of early afternoon Friday, I still had no idea what I wanted to hike over the weekend. I would have loved to make the 14ers.com Fall Gathering in Lake City, but with a three-day trip to Vegas right around the corner, I wanted to spend a bit of time Sunday at home with Kate, Remy, yardwork and Carolina Panthers football.

What I did have was interest from two of my favorite climbing partners, Ryan Kushner and Matt Speth. We bounced ideas back-and-forth until it seemed unlikely we’d ever reach a consensus. I was starting to resign myself to a mellow solo hike when a mutually interesting goal finally emerged: the West Ridge of Quandary Peak.

bb0ca-1461099_10100923968666586_4276488059176234041_n

Ryan also recruited a few of his other friends, local climbing celebrities Alan Arnette (fresh back from success on K2), Jim Davidson (author of The Ledge) and Chris Tomer (FOX31/Channel 2 meteorologist). They agreed to join after their original goal of the Bells Traverse fell through due to last week’s snowfall. It was my first time hiking with all three of them, though I’ve rubbed shoulders and shaken hands at various events over the years.

We opted for a gentlemanly start of 8:30 a.m. Saturday. The route generally takes 6-8 hours roundtrip, and with no more fear of monsoonal thunderstorms, there wasn’t much reason to set an alarm for zero-dark-thirty. Ryan, Matt and I met Alan and Jim at the trailhead and decided to set up a car shuttle, leaving one vehicle at the base of the East Ridge and piling into the other to head to the Blue Lakes Dam near the start of the West Ridge.

The trail was mostly dry as we followed it up into a hanging basin toward the saddle between Quandary Peak and Fletcher Mountain. The majority of our time was spent discussing a potential fundraiser event and spying ice lines, which are starting to form all over the high country.

51685-1383585_10100923968526866_2909034887014448846_n

Chris was waiting for us on the saddle after starting early to tack on Fletcher Mountain. Most of the route came into view for the first time, with a largely mellow-looking ridge interrupted by a few daunting rock spires. The top — and the route’s two cruxes — remained out of sight beyond a false summit.

Easy scrambling and narrow Class 2 sections led to an old mining trail on the north side of the peak. I used the mental break to chat with Jim about The Ledge and reminisce with he and Speth about our Rainier experiences. Once over the dominant false summit, the cruxes came into view and our minds returned to the task at hand.

A Winter Preview on Quandary's West Ridge

A Winter Preview on Quandary's West Ridge

Snow conditions dictated that we stick to the ridge. Easier options exist in the summer by dropping down a ways, but the mountains had received a decent dump of snow earlier in the week. The north face in particular looked almost winterish. With Alan, Ryan and Chris leading, we took turns negotiating several exposed Class 4 and 5.easy sections. The first summer “crux” was actually a nice break in the action. It was my first time on the route, and I naively thought we’d bypassed all the difficulties by the time the worst difficulties actually started around 14,000’.

After another short, narrow Class 2 ridge walk, we found ourselves going up and over several spires. The last one required a steep 15-foot  Class 4 downclimb with a couple long steps to reach the relative safety of a lofty notch. From there we could see the second summer crux, which was said to be the most difficult section of the route. We were well to climber’s right of it, on the ridge proper. An ascending traverse across snowy Class 3/4 ledges put us back on track right as the climbing laid back to easy Class 2 walking.

dbabc-10718368_862000757173228_1379345826_o

d4405-10388069_10100923969090736_6657802947999762217_n

The wind had howled steadily between 15-25 miles per hour most of the day, and near the summit it nearly doubled. We staggered the last 100 yards to the highest point and gratefully cowered in a wind shelter to eat, drink and rest.

We stayed on top for about 15 minutes, snapping a couple group shots before heading down the standard East Ridge route. A few weeks had passed since I’d last visited the mountains, and seeing them coated with snow brought pure joy. Summer climbing is enjoyable in its own way, but I won’t miss the crowds. There’s also nothing more uplifting than looking out at a sea of white-capped peaks in all directions. It’s the definition of beauty.

fcd5a-10646721_10100923969175566_140708452373030492_n

d279e-10722478_862003213839649_897913586_o

The walk down was uneventful. We encountered 15-20 other hikers making their way up or down the East Ridge, a far cry from the 100s that tackle Quandary every summer Saturday. The car shuttle ended up being a godsend, as most of us were pretty wiped from spending so much time in the wind on exposed terrain. Not to mention, my mountaineering boots had turned my feet to mush. It was my first time wearing anything but trail runners in months. Time to toughen up.

37425-10615992_10100923999040716_8978907195452026680_n

It felt good to succeed on a fairly challenging route after a summer spent on Class 1, Class 2 and easy Class 3 peaks due to my ongoing recovery from shoulder surgery. It’s mostly a mental thing now, and Quandary’s West Ridge was a big step forward. I just hope I’ll be full-go by ice season, which looks to be starting here shortly…

#iceupson
#winteriscoming

Thanks for reading.

A Walk to Remember (Mt. Harvard)

Mt. Harvard – South Slopes

RT Distance: 14 miles
RT Gain: 4,600′
RT Time: 6.5 hours
Climber(s): Jeff (SurfNTurf)

Mt. Harvard has crooned its siren song in my direction all summer. Of all the 14ers, it was the one I’d least-recently visited, way back in March 2011. I’d also never seen Horn Fork Basin in summer, and because I’d forgotten my camera during that March excursion, Harvard was one of the few 14ers on which I lacked a summit photo. I’ve even toyed with the idea of writing a TR for every 14er. All of those reasons are good and all, but in the end, who needs an excuse to go hiking on a gorgeous summer Saturday?

I woke up at 2:30 a.m. to meet colokeith and a few others for a climb of Kendall Mountain. I’d only managed an hour or two of sleep, and I was so tired I actually felt nauseous. An apologetic text to Keith later, I was back in bed with a new alarm set for 5 a.m. Finally getting in my car, I had no firm idea of where I was going. The I-70/C-470 junction forced me into a decision. Knowing that the forecast in the Sawatch was best, and that Harvard was near the top of my list to repeat, I chose to head down to U.S. 285 and streak toward Buena Vista.

Arriving at an overflowing parking lot at 8 a.m. is an odd feeling. I was always a stickler for starting early, and I still am when it’s warranted, but the forecast was good and the plan was to move fast (for a hiker; I don’t usually run). It actually worked out pretty well. If you want some solitude on a summer 14er, just start super early or super late. I only saw 6-7 people all day until I caught the peloton just short of the summit block.

Walking along the initial trail was like a jaunt down memory lane. Sadly, many of the friends I made that weekend of the Winter Gathering 2011 aren’t around anymore. It was the first time I hiked with James Graham (aka Fletch, now living in California), who would go on to become one of my favorite partners. Terry Mathews, Jim DiNapoli and Steve Gladbach, all three of whom I was encountering for the first time, are no longer with us. I’ll never forget the feeling I had when Steve approached our tent. I was like a 14-year-old girl meeting Justin Bieber. It was my first winter camping trip, and Harvard/Columbia were only something like Nos. 15-16 on the 14ers list for me. I was new to the game, and Steve was a legend.

Because it turned into a reflective walk, I’m going to include some of Jim’s pictures from the March 2011 trip – with credit to the talented photographer, of course.

The trail was surprisingly flat, nothing like I remembered it was we snowshoed in at dusk with 60-pound packs three years prior. The miles melted away. It would be hard to get lost on the well-marked route, but when in doubt, take a right and follow signs for Horn Fork. Campsites start to appear pretty low and continue on up to the highest reaches of treeline. There are some gorgeous spots up there, and I saw a ton of people taking advantage of it. Horn Fork Basin is definitely going on my list of places for a summer overnight. Try as I might, I couldn’t identify the exact meadow that served as base in 2011. The trail seemed to stay too far to hiker’s left.

Breaking timberline, the well-defined trail remained fairly gradual. There are some sections where you have to walk through a veritable willow tunnel, but just look over your shoulder at the stunning views of Mt. Yale every few minutes and the misery will fade.

The route finally steepens at a rocky headwall. After talus hopping for a few hundred feet, you arrive back on a dirt path in a high upper basin. The remaining trail to the blocky summit becomes obvious. There’s a short reprieve on flat ground before it gets very steep as you slog up toward the ridge. I remembered this section being a moderate avalanche concern back in 2011. We took turns sprinting up to the ridge as fast as possible, and then followed the ridge proper instead of the trail down on the face.

About 500 feet short of the summit, I caught the main body of climbers. I’d almost thought Harvard wouldn’t be crowded. Wrong! The standard summer conga line ensued. It wasn’t too bad except for a bottleneck up the Class 2+/3 section right at the base of the summit. It was much more straightforward than my previous ascent, when snow covered the obvious path and we faced a terrifyingly exposed scramble to the top.

My goal had been to top out in three hours or less, but it took me roughly 3:15. I’m still carrying a bit of surgery weight and I haven’t gotten out as much as usual this summer. Ah well. Good motivation to train harder. I lingered on the summit for 20-30 minutes, snapped the coveted #summitselfie, and started down just as graupel was beginning to fall at 11:45 a.m.

As usual, once I finally gave in and put on my rain gear, the precipitation stopped within minutes. I thought about jogging down the trail to see what kind of RT time I was capable of, but I was enjoying the hike too much. Long-forgotten memories from 2011 came flooding back. It was great to remember friends and experiences that seem a lifetime ago. Not to mention, Horn Fork Basin is a pretty special place.

I returned to the car at 2:30 p.m., roughly 6.5 hours RT with a very casual descent pace. I had to stay in the hills (not complaining) to lead a Colorado Mountain Club hike Sunday, so after a pizza and a couple beers at Eddyline, I set up camp at the free dispersed sites across from the Avalanche Gulch TH. I sipped a few Dale’s, made a small fire, and read Anatoli Boukreev’s Above the Clouds in between periods of continued reflection. I’m a social hiker and I enjoy exploring the mountains with friends, but sometimes, a little solitude can cleanse the soul.  


Mt. Adams: Adams Glacier (Grade III, Steep Snow, AI2)

Mt. Adams: Adams Glacier
(June 29 – July 1, 2014)

Mt. Adams (12,276’) is known as “Washington’s Forgotten Mountain.” Less than 50 miles from the legendary Mt. Rainier, poor Adams is often lost in the shadow of its larger cousin. It doesn’t help that the standard South Side walk-up route is the Pacific Northwest equivalent of Quandary’s East Ridge, one of the easiest climbs to the top of a major Cascade peak. Mountaineers are quick to dismiss Adams. Even Mt. Hood, more than 1,000 feet lower, garners more attention.

But for those willing to venture to the more remote North Side, the second-highest mountain in Washington offers bountiful rewards. The crown jewel is the Adams Glacier, a tortured 4,000-foot icefall that requires diligent routefinding, steep snow climbing and several pitches of alpine ice. Sam and I began targeting this climb in early 2014.

IMG_1772

We departed Denver at 10:20 a.m. Sunday, June 29. The original plan was to have a leisurely day Sunday, hike in Monday and summit Tuesday. Record-breaking high temperatures in Washington on Monday/Tuesday, complete with overnight lows in the upper 40s, spooked us into an audible. Falling rock and ice, tumbling seracs and collapsing snow bridges already had us worried enough; we didn’t need those threats amplified by baking heat.

Instead, we rushed straight from the airport to the trailhead, beginning the approach hike at 5:45 p.m. Sunday. As luck would have it, a snow drift blocked the otherwise dry road about two miles from the proper trailhead. Hooray for impromptu road slogs! At least the promise of a solid overnight freeze partially allayed our fears. The negative was we had to stop about 500 feet short of our planned campsite due to impending darkness.

IMG_1773

Here we experienced another setback. Despite brand new batteries and being in lock mode during travel, both of our Black Diamond Storm headlamps died almost immediately. I still don’t know what went wrong. I carry a spare 35-lumen Black Diamond Gizmo in my emergency kit, but that wasn’t going to do us much good trying to negotiate a tricky route in the dark. We agreed to start around first light at 4:30 a.m. instead of the normal 2-3 a.m.

We followed a patchy trail past the traditional camping area and slogged toward the start of the glacier at around 8,000’. As with most of the Pacific Northwest volcanoes, the scale on Adams is immense. Features we thought we’d reach in 15 minutes took 45. We eventually found ourselves roping up about two hours after setting out, just as the sun was starting to hit the upper glacier.

IMG_1777

0c58e-10494616_10100823133595876_1077396659491134282_n

The climb started with 45-degree snow slope followed by a 50-degree chute of hard snow, which had been called the crux by prior trip reports. The normal line stays right up most of the glacier, followed by a long traverse left to access the summit plateau. Tracks from a Sunday party veered left way early, and having spoken to them on their way out, we knew they were successful. A teetering serac looming over the right-hand option convinced us to follow the bootpack left. This option immediately led to much more technical terrain.

The Adams Glacier is described as a moderate-to-steep snow climb with perhaps a few steeper sections of alpine ice, depending on varying conditions from year to year. Most guidebooks put the maximum angle at 45- to 50-degrees. The left-hand line, however, put us on a rolling hump of 55- to 60-degree neve and alpine ice. In some areas the ice probably touched 65 degrees. We were comfortable simul-climbing it, with the expectation the steep stuff would only come in short bursts punctuated by moderately angled snow. We couldn’t have been more wrong.

The middle of the route was a sustained 500-foot section that never relented to less than 50 degrees. The only rest we found was a T-slot someone had chopped out for a belay. With some careful maneuvering, we were able to sit in it for a few minutes to eat, drink and rest our screaming calves.

IMG_1793

Finally, just when I thought my calves were going to start cramping, the angle laid back. We were able to walk again rather than frontpointing. Hallelujah. Of course, we still had about 1,000 feet to go over snow bridges, under seracs and around crevasses, and the day was becoming stiflingly hot. Our tensions were eased, however, by the end of technical difficulties and the mostly obvious route to safety.

We took the time to admire the stunning environment. Glaciers have to be among the prettiest natural places on earth, and our previously neglected cameras found themselves in overdrive. Some of the crevasse and serac formations high on the route were simply spectacular.

42d6c-10523210_10100823133960146_3918722984456962755_n

3512e-10527715_10100823133870326_9007790389772267636_n

A final challenge was presented in a heavily broken section directly underneath the largest serac band on the face. We nervously crossed a few thin, sketchy snow bridges and had to reverse a couple times when we came upon an insurmountable gap, but before too long we’d escaped the threat of the ice cliff and were starting up the mellow unbroken snow slopes to the summit plateau.

The final slopes, though completely safe, brought their own degree of difficulty. What we’d thought all day was the summit turned out to be a very minor subpeak, and a second false summit taunted us as well. We took a long break to eat, drink and improve morale. The true summit eventually made itself known when we saw small dots of people who had come up the South Side.

Like on Mt. Hood in 2013, I was lucky enough to enjoy a bluebird summit with clear views and no wind. Rainier was just to the north, with the Kautz Route (our next objective) obviously visible. Mt. Hood, Mt. Jefferson and the Three Sisters were all easy to make out to the south, along with the remnants of Mt. Saint Helens to the west. We only shared the top with about four or five other people during our 45-minute vigil.

_DSC8647

ab92c-10487588_10100823134414236_7347807940473584815_n

The descent was via the infamous North Ridge, a steep and sometimes exposed cleaver of shattered pumice. It ended up not being all that bad, probably because we were able to stay on snow most of the way. Even the few sections of rock we negotiated weren’t as terrible as advertised. I guess us Coloradans cutting our teeth in the crumbling Rockies translates well to other areas, haha.

We bailed off the ridge about three-quarters of the way down, glissading a gully to reach our morning tracks. An hour-long walk saw us returned to camp, but relief was not to be had. The previous night had been cold enough to ward off another huge negative aspect of this route: mosquitos. Now, in the early evening of a muggy day, they were out in full force.

The sheer number of the damn things was mindblowing. At times it was hard to inhale without swallowing one or more. Sam had bought some Jungle Juice (98% deet), which the salesman said was illegal in some stores and and should be applied conservatively. He suggested a dab or two on a bandana should do the trick. Having done this and still wearing a coat of bloodsuckers, we threw caution to the wind and showered ourselves in the toxic liquid. It still didn’t really help.

Seeking relief, we dove into the tiny Black Diamond Firstlight tent and stripped down to our skivvies to make the heat tolerable. It was extremely romantic. We passed a long few hours until nightfall, boiling in our own juices, counting the mosquitoes on the tent wall and trying not to touch each other. I escaped the tent to take some sunset photos and melt more snow once the temperature dropped and the buzzing assholes disappeared.

Mt. Adams: Adams Glacier (Grade III, Steep Snow, AI2)

Not to worry! They were back with a vengeance the following morning, even at the early hour of 6 a.m. We packed our gear as fast as we could and got the hell out of there. The hike out went fairly quick to the actual trailhead, but the remaining two-mile road slog to the rental car was soul-crushing. What had appeared flat on the hike in turned out to be largely uphill on the return. We probably gained 500 feet on the way out in the rising heat of one of the hottest Washington days on record.

Mt. Adams: Adams Glacier (Grade III, Steep Snow, AI2)

The sufferfest was worth it when we rolled in to Morton, Wash., just in time for the USA vs. Belgium soccer match at The Bucksnort Pub. It took a little charm to get the bartender to warm up to the two smelly cityfolk asking to watch a Euro girl-sport, but after a while she and the other bar patron at 1 p.m. on a Tuesday, a fellow called simply Skeeter, embraced us like old friends. The beer probably helped. We even summoned the courage to order burgers after about an hour.

All in all, the Adams Glacier was an amazing route that was definitely one of the finest of our lives. Surely our next objective, the Kautz Glacier on Mt. Rainier, would be a comparative cakewalk. We even had two full days to recover! Basking in the afterglow of Mt. Adams and regarding Rainier as halfway in the bag, we contentedly passed the next 48 hours visiting the Wylam family in Centralia, Wash., and putzing around the touristy areas of Seattle. As it turns out, the Kautz wouldn’t be so easy…

Chasing Ice: A Dress Rehearsal (Longs Peak / The Flying Dutchman)

MOUNTAIN: Longs Peak
ROUTE: Flying Dutchman (Steep Snow, WI2)
RT GAIN: ~4,100′
RT DISTANCE: ~11 miles
RT TIME: 10 hours
CLIMBERS: Keegan, Sam, Jeff

Sam, Keegan and I had never climbed together as a team. Keegan had a little jaunt to Alaska to worry about, I was recovering from shoulder surgery and #SSSala was always busy trolling Facebook. With only two weeks before our trip to the Pacific Northwest, we figured at least one dress rehearsal probably wouldn’t be the stupidest thing we’ve ever done.

We settled on the Flying Dutchman because it replicates what we’ll be facing up in Washington (Kautz and Adams Glaciers) — a multi-hour approach, steep snow and a brief section of WI2/3. The Dutchman ended up being one of my all-time favorite routes. Better yet, we spent the day in solitude while party after party swarmed Dreamweaver. As an extra bonus, if you’re a teenage French-Canadian, you can climb it in tennis shoes!

We set off from the trailhead a little after 5 a.m. and reached Chasm Junction on a dry trail in about two hours. I’d been up that way several times before, but somehow this was my first trip ever taking a left and heading toward Chasm Lake. Always love treading new ground. Snow patches began to appear, but most of the route remained dry and easy to follow. We crossed around the left side of the lake on boulders and snow to arrive at the base of the route.

 
By the time we’d taken a break, geared up and discussed tactics, it was about 9:15 a.m. We decided to rope up from the start to practice glacier travel and pacing. Sam was to lead, so we saddled him with all the gear and rejoiced as our backpacks dropped dramatically in weight.


The fun started from the get-go with a small, low-angle ice and mixed patch  to enter the couloir proper. From there it’s an ever-steepening snow climb up about 1,000-1,200 feet to the ice crux. I’d estimate it started around 40 degrees and maxed out at 55 or 60 degrees on the WI2 step. Sam carried a couple pickets for protection, but we never felt the need to place any. We pulled off to the rocks a couple times when a good rest ledge presented itself, belaying each other in and out.

Finally, the ice step appeared. We weren’t really sure what to expect and were thrilled to find what looked like good ice, though a bit sunny and wet. It was much shorter and lower angle than we were anticipating. A few sticks saw us over and back onto lower-angle snow. Sam briefly considered building an anchor for a proper belay, but it looked easy enough that we just simul-climbed it. Sam placed two cams (one below, one above the ice step) and a picket for peace of mind. It was my first time swinging tools since shoulder surgery in January, and even though I was horribly inefficient, the stoke levels were off the charts.

We reached the exit and regrouped on easier terrain at 12 p.m. The wind had been annoying all day, and now dark clouds were building to the northwest. None of us really cared all that much about a summit after having so much fun on the route. With burgers and beers at Oskar Blues beckoning, we unroped and set off down Lambslide. The snow was still hard enough to warrant crampons. No glissade, unfortunately.

The Chasm Lake cirque is simply stellar. I found myself stopping every few minutes to just stop and look around. You hear about all these famous features, but it’s a totally different experience when you see them in person, close enough you can almost reach out and touch. We went around the opposite bank of Chasm Lake this time, hoping for good views of the Dutchman. We weren’t disappointed.

The rest of the walk was pretty uneventful, with each of us retreating into our own thoughts (mostly of bacon cheeseburgers and Dale’s) for the slog out. The snow is melting quickly up there. Go get after it while you can!

Gear Review: First Ascent Alchemist 30L
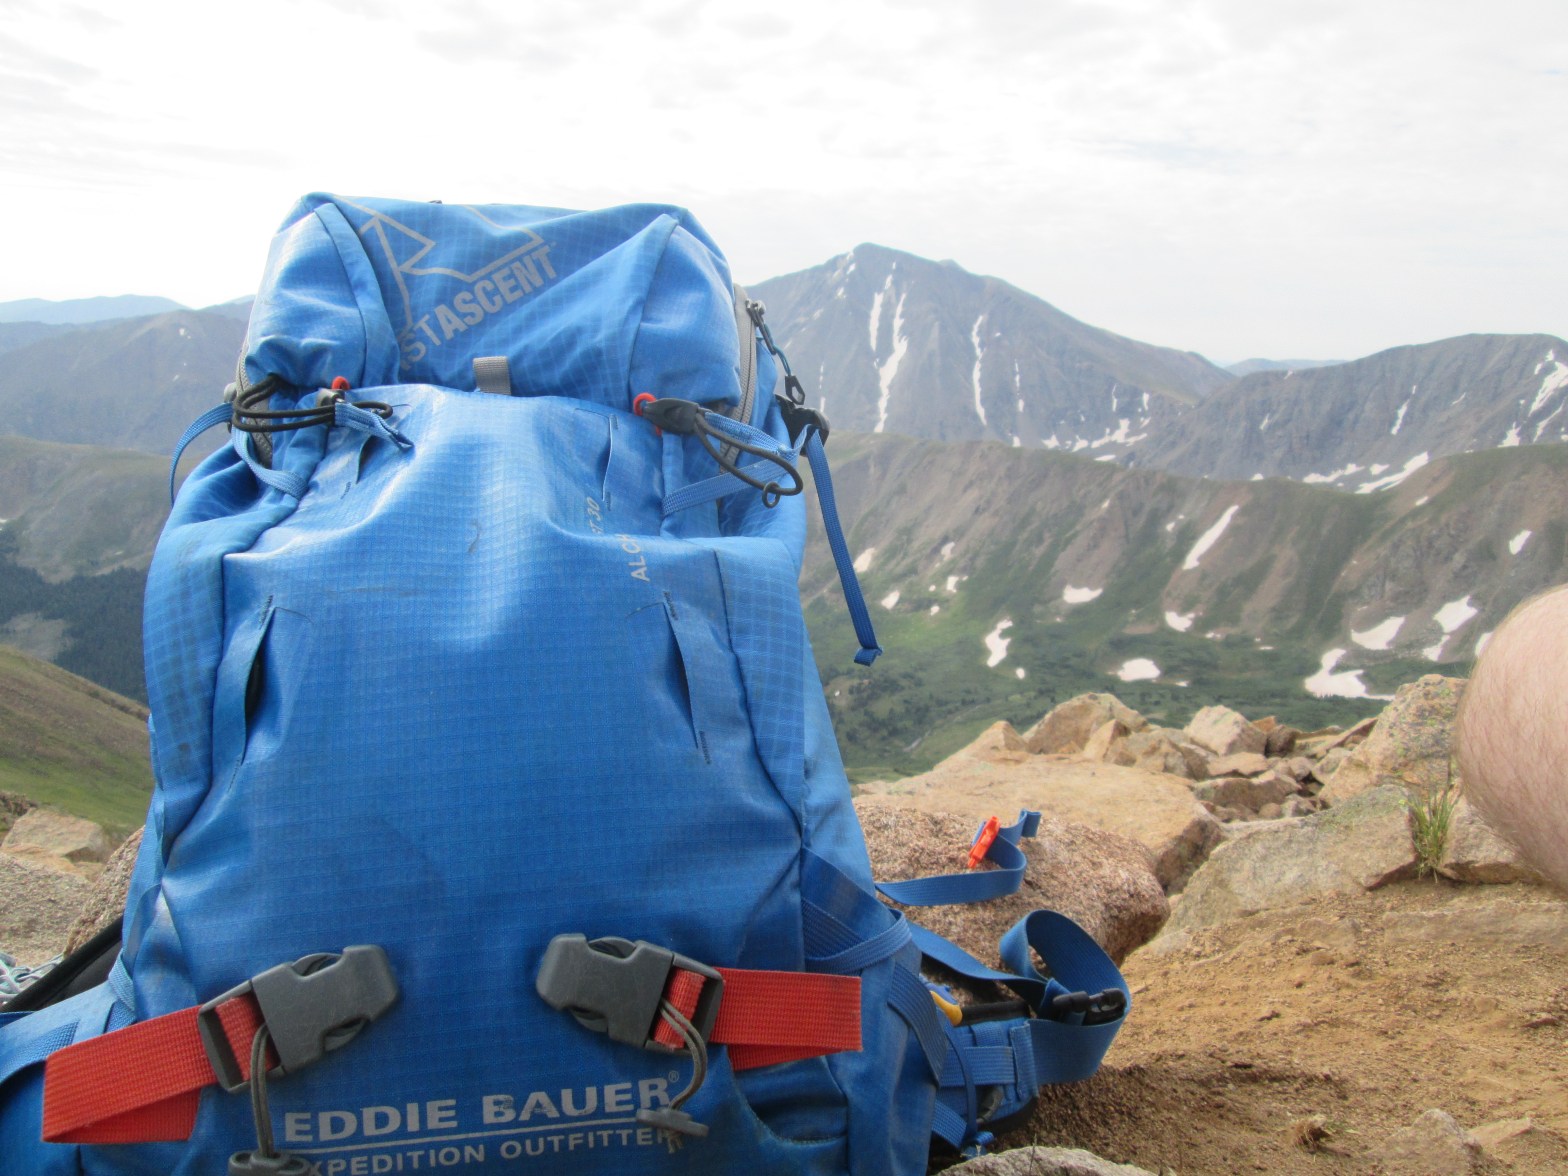
One thing I’ve never understood about gear reviews: most of them are done by people who just received the product and haven’t put it through any paces. They cut the tags off, try it on, zip and unzip a few zippers and suddenly they’re experts. I get it, the company probably sent you their hot new item for free and expects a timely write-up in exchange. That also means the review is almost certainly going to be positive. It only makes sense to keep that pipeline of free gear open, right?

I’m not going to review any item I haven’t personally used for at least a month. In fact, to start off, I’m going to break down a backpack I’ve owned for nearly two years: the First Ascent Alchemist 30 (Retail: $129).

Alchemist 30 on Blanca Peak in winter

I’m what many would call a pack whore. I own and consistently use six, ranging from 9L to 60L. Each has a niche, but none matches the versatility of the Alchemist 30, by far the backpack I find myself reaching for the most.

I worked at Eddie Bauer for about a year in 2012-13. Obviously, I had the opportunity to inspect the company’s packs in detail. To be honest, with exceptions, many of them felt like the designers were trying too hard. There were too many features, too many gimmicks, too much weight and too bright of a color scheme. The reviewed pack’s big brother, the Alchemist 40, is a chief offender.

While the Alchemist 30 might be guilty of color options that could cause seizures in children (…that limeade…), it remains blissfully unmarred by the other aforementioned flaws. It’s like Eddie Bauer made the Alchemist 40, cut away all the junk, and the more more effective 30-liter version was what remained.

Here are the roles the Alchemist 30 fills for me:

  • Spring Couloirs
  • Short Winter Dayhikes
  • Long Summer Dayhikes
  • Ice Cragging

That’s impressive considering that each of my other five packs only has a niche or two. If I was starting over and could only afford one, the Alchemist 30 is what I’d buy.

My favorite feature is the quick-release tool carry. Flipping an ice ax in and out of a traditional loop can be a pain, especially on steep slopes. This system eliminates that hassle and keeps the sharp picks of ice tools hidden under a layer of fabric.

The interior organizer pockets are among the best I’ve seen. The Alchemist 30 swallows avy gear and bulky winter/spring layers with ease, and it’s not hard to keep track of where everything’s stashed. How many other packs can carry an avalanche shovel so well you almost forget it’s there?

Other technical bonuses are gear loops on the hip belt (double as ice ax holsters if you briefly need your hands) and exterior side pockets perfectly suited to carrying pickets or wands. Several online reviews decry the exterior side pockets for not being large enough to carry a Nalgene, but that’s not the point. This is a climbing pack.

Speaking of hydration, the bladder sleeve, tube exit hole and shoulder straps are designed pretty standard to support a Camelbak-type system. The tube exit hole can be a bit difficult to locate, but that’s a non-issue after the first time. Eddie Bauer says the side pockets can also carry skis. I can’t speak to that. There are several ways to strap on snowshoes, though.

I haven’t used the Alchemist 30 in a rain storm (I live in Colorado, after all), but otherwise the ripstop material has impressed. It sheds snow well, and the pack still looks new-ish despite two years of being dragged abrasively across rock and ice.

It only comes in one size, so your mileage may vary in this regard, but the Alchemist 30 is the most comfortable pack I own. Pain between the shoulder-blades is a rarity, and it has never chafed my hips like several of my other backpacks. It somehow manages to make 25-pound loads feel like 10-pound loads.

Alchemist 30 performing well on a late fall dayhike

Not everything about this pack is positive. The four plastic external “hidden” gear clips are too hidden to be of any use. I tried rigging a system to carry crampons there, but cut it away after it almost resulted in a lost crampon.

The Alchemist 30, like many FA packs, is on the heavy side. At 4lbs 3oz, it’s a full pound heavier than the comparable and larger Osprey Variant 37. It’s almost double the weight of the average (admittedly less fully featured) 30-liter pack. The plus side is it carries that weight so well it’s hardly noticeable.

Finally, part of me wishes the Alchemist 30 had a top-lid to make carrying a rope easier, but that would add even more weight and the wide-mouth entry system is pretty handy. I think I’d be happy either way.

So, what would I rate the Alchemist 30? Rather than assign an arbitrary number from zero to 10 or 100, I’ll end all my gear views with the following simple question:

Would I recommend the First Ascent Alchemist 30 to a loved one? Yes.

A Week Among the Clouds (Mt. Rainier / Liberty Ridge and Mt. Hood)

INTRODUCTION

Liberty Ridge. The classic Grade III/IV snow-and-ice route on the insidious North Face of Mt. Rainier has earned innumerable superlatives; many consider it among the best climbs in the Pacific Northwest. An equal number of others, of course, dismiss it as overrated.

Featured in Roper and Steck’s prestigious Fifty Classic Climbs of North America, the ridge splits the rarely climbed Willis and Liberty Walls, providing a relatively safe line to the summit at the cost of an arduous approach across the Winthrop and Carbon Glaciers, sustained steep snow, at least one pitch of alpine ice (often more, as our team would discover) and an alternate descent route requiring climbers to carry heavy packs up and over the 14,411-foot summit.

North Face, Mt. Rainier

Immediately after summiting Rainier via the standard Disappointment Cleaver route in July 2012, I e-mailed my regular climbing partners about a big trip in 2013. The responses varied. As usual, however, Rob Jansen and I were on the same page. We knew it would take a year’s worth of dedicated training to make ourselves worthy of the challenge, but Liberty Ridge became the object of our obsession.

Sadly, Rob passed away in late August 2012 in a rock slide on Hagerman Peak before the trip progressed beyond the planning stages. At the time of his death, we’d climbed more than 25 mountains together in a mere 10 months. The loss of my close friend and No. 1 climbing partner shook me to my core. His father told me during the memorial service to keep “carrying the torch” for his son, and I knew that meant going forward with our mutual dream of ascending Rainier via our dream route.


James Graham and Darrin Nicholas were my mentors as I transitioned from East Coast beach bum to 14er finisher, and I count both among my closest buddies. It was a special moment for me when they invited me to join their own Liberty Ridge attempt a few months later. I readily agreed.

The reality, however, was that James is a good deal heavier than us, and the crevasse danger on the Carbon glacier is real. Darrin and I might have had problems if James took a fall. For that reason we added a second rope team to the party, consisting of three other climbers: Nao Takano, Keegan Young and John Fatseas.

I applied for and was awarded a Live Your Dream grant from the American Alpine Club for the climb, and without such support this trip wouldn’t have been possible. A huge thank you to everyone at the AAC for allowing me to live not only my dream, but one which Rob and I shared. I’m also indebted to Eddie Bauer/First Ascent Park Meadows, which let us demo a First Ascent Katabatic when we needed a second three-man mountaineering tent.

Climbing expeditions rarely go as planned. The trip I’d imagined as we boarded our plane on the morning of Saturday, June 8 was vastly different than the trip I’d experienced by the time I was on the return flight Sunday, June 16. I can say without a doubt, however, that the vacation was a success for our entire six-man team, and everyone made the correct decisions for themselves. We came home alive, we came home friends and we came home with summits.

MT. RAINIER – LIBERTY RIDGE

Weather windows in the Pacific Northwest are rare, especially in June, and we were graced with a beautiful one. Sunday and Monday were mostly sunny with no chance of precipitation during our approach, and Tuesday, our summit day, called for partly sunny skies with a small chance of precipitation toward the evening. A minor storm was forecast for Wednesday and Thursday.

The ranger at White River told us to bring snowshoes, which caused a communal groan heard as far away as Paradise. Previous parties reported chest-deep snow followed by bare ice from 12,500’ to 14,000’. The ice beta proved accurate, but the snowshoes stayed on our packs for 98 percent of the trip.

Setting off

The meandering trail from the White River Campground switchbacks ever upward, crossing streams and offering fleeting views of Rainier’s upper reaches. We started encountering snow around 6,000’ and finally popped out above treeline onto the Inter Glacier after 2.5 hours of hiking.

Some donned crampons here, while I opted for snowshoes because I figured the heel lifts couldn’t hurt for the slog up to St. Elmo’s Pass. We entered our own little worlds and formed a strung-out line on the crevasse-free Inter Glacier, ascending at various paces. Gaining St. Elmo’s Pass meant traversing onto the Winthrop Glacier and the removal of ~10 pounds each worth of ropes and hardware from our packs. Motivation came easy.

Roped to Keegan and Darrin and followed by Nao, John and James, we set off across the glacier. The Winthrop is hideous up high, but our line stayed flat and angled slightly down toward Curtis Ridge. We crossed our fair share of crevasses, maybe a dozen, but all were less than a foot wide that early in the season.

Crossing the Winthrop Glacier

The lower slopes of Curtis Ridge are wide and deceiving. To make matters worse, a cloud-and-fog layer rolled in and obscured our views. Time and time again, we thought we’d reached camp, only to see more ridge awaiting ahead. The best advice I can give to prospective parties is when in doubt, angle down (right). The best campsites are around 7,200’ to 7,400’. The Carbon Glacier is easily accessed by a 50-foot scree slope lower on Curtis Ridge, but you’ll become cliffed-out by ascending too high.

We pitched our two three-man tents in the only flat spots we could find. The fog occasionally gave way to teasing glances of Liberty Ridge above. Every time we climbed a nearby cliff to scout a safe path across the Carbon, clouds reappeared. The routefinding would have to wait for morning. Our bellies full and snow melted, we crashed as soon as we could, with alarms set for 4:30 a.m.

Curtis Ridge Camp, with Liberty Ridge partly shrouded behind

Cue the best sunrise I’ve seen in my life. It took a full 20 minutes longer than usual to get ready because I couldn’t pick my jaw up off the talus. Finally ready to move an hour and a half later, we were ecstatic to find the short scree slope onto the Carbon Glacier within a stone’s throw of our campsite. The early morning light on Liberty Ridge revealed our beta was accurate: everything above the Black Pyramid was a shimmering field of ice.

Liberty Ridge

Some consider the Carbon Glacier the most dangerous section of the entire route. It’s Rainier’s thickest, longest and most active glacier, with a reported depth of 750 to 900 feet. Massive crevasses yawned everywhere. The morning quiet was interrupted at regular intervals by the gunshots of collapsing seracs. A 30-second waterfall of rocks fell from the toe of Liberty Ridge itself, and hundred-foot-wide avalanches swept silently down the Liberty and Willis Walls, threatening anyone who got too close. It was time to focus.

Despite the surrounding dangers, we raced across the Carbon. The flat, middle part of the glacier was remarkably lacking in open crevasses. Above the 7,600’ level or so, the routefinding became more tricky. We routinely had to step over foot-wide crevasses, including one on an uphill slope that required the solid placement of an ice axe pick for most of us, and another that was actually two crevasses with a thin intervening platform. We also trod through a small icefall, weaving around seracs and over a wonderland of snow formations. It was dangerous, sure, but my God was it beautiful. Even now I smile in reflection.

Onto the Carbon Glacier

Above the icefall, the glacier once again flattened out and we stopped for a break. The entrance to Liberty Ridge was less than an hour away. Another serac collapsed on the Liberty Wall, starting a minutes-long avalanche that appeared close enough to touch. We started again, but stopped a few hundred feet later to have a group meeting that would change the course of my week.

Break time on the Carbon

For several valid reasons, James expressed that he was throwing in the towel. The rest of the group wanted to press on, including myself. Backtracking over the wicked Carbon and the milder but still broken Winthrop was inarguably roped-up terrain. James walking out alone, especially with the day heating up, would be taking an enormous risk.

I wanted the route more intensely than any I’ve attempted in my life and I couldn’t have felt stronger. I’d trained hard, given up drinking for months, learned a ton of new skills, read and re-read trip reports and route beta, sought grant opportunities with the AAC — it’s not an exaggeration to say Liberty Ridge dominated nearly a full year of my life.

I searched inward. This climb, for me, was as much about remembering my friend Rob as achieving personal success. Every step was one I should have been taking with him. I began to wonder what Rob would do in that situation. He was one of the most selfless climbers I ever met, and there on the glacier I recalled a memory I shared during his memorial service. Long story short, he once told me, “You’re my friend, and I’d do anything for you.” James is one of the better friends I have. I understand how cheesy it sounds, but my choice was suddenly made for me. With only a touch of reluctance, I opened my mouth and told James I’d head down with him.

Before another half-hour passed we had the ropes reordered, the gear redistributed, and the respective teams of four and two were ready to go their separate ways. Darrin was already ahead, but as John, Keegan and Nao trudged by, I shared a moment and a hug with each of them. I wished them sincere good luck and lent John my camera. Then, it was time to go down.
 

MT. HOOD 

Mt. Hood, South Side

The plan was to take a rest day or two while waiting for John, Darrin, Keegan and Nao to come off Rainier and join us for an attempt on Mt. Hood. Unfortunately, the other members of our party ended up having such an epic on Liberty Ridge that they decided against any more climbing and caught early flights home. James and I headed down to Hood on our own. We were joined by good friend Bill Wood, who found a cheap last-minute flight from Denver to Portland.

While Mt. Hood’s standard Hogsback route pales in difficulty compared with Liberty Ridge, the highest point in Oregon is no slouch. Hood, simply put, is aesthetic. It’s often said that if you ask a kindergartner to draw a mountain, the picture you’d get in return is Mt. Hood. The slopes sweep upward from all directions to reach a perfect pinnacle, eternally capped with snow. From certain angles the mountain calls to mind Wham Ridge blanketed in white.

After waiting out a few days of imperfect weather, Friday promised to be better. It didn’t seem that way when our alarms went off at 3 a.m. Outside the Best Western, the world was shrouded in mist. A startlingly chill wind whipped us from all directions. Regardless, we were there, we were awake and this was our one shot. We piled into the rental car and drove up to the trailhead at Timberline Lodge.

I was on a mission. Most parties hit the trail closer to midnight, but we cocky Coloradans were lazy and aimed for a 4 a.m. start, which in actuality became 4:30. I was concerned about being forced to turn around by late-morning falling rocks or ice, or the cloudlayer rising with the day’s heat. As has been proven in tragedy after tragedy, the upper slopes of Mt. Hood are no place to be caught in a whiteout. Though we carried ropes and a small rack as a precaution, the likelihood of needing them was nil. I bolted for the summit as fast as I could manage, with the mutual understanding I’d stop to wait for James and Bill if conditions warranted.


Sunrise over a cloud layer on Mt. Hood

My personal goal was to top out by 9 a.m. Maybe it was my Colorado acclimatization, maybe it was my fear of leaving the Pacific Northwest without a summit, or maybe I was simply channeling my inner Rob Jansen (he was an exceptionally fast hiker and finished 33rd in the 2012 Leadville Marathon), but I was shocked to find myself on the summit at 8:30 a.m., four hours after setting out.

The first 2,500’ of the route is as boring as snow climbing gets. One literally walks up a ski slope, using a chairlift as a guide. The views we had that morning made even that portion enjoyable. The entrapping cloudlayer leveled off at about 6,000 feet, the same elevation as the trailhead. We were soon above it. Sunrise hit early because of our late start, and it presented an astounding scene coupled with the low clouds, nearby Mt. Jefferson and Hood’s own mountain shadow.

Hogsback and Mt. Jefferson

I caught a large group of several parties at the Hogsback, where everyone stopped to put on crampons. Here, only 700 feet from the summit, the route becomes spectacular. Fumaroles spewed wisps of steam that polluted the air with sulphur, singeing the nostrils; a single crevasse known simply as the bergschrund gaped wide; the Hogsback provided an aesthetic line of ascent and the final push beckoned as a fine snow-and-ice climb.


In years past, the Pearly Gates — a direct line from the top of the Hogsback to the summit — was the standard route. Recent shifts in weather have made this section steeper and icier, so most climbers traverse left to a snowfield known as the Old Chute. Now ahead of the masses, I took the middle ground, up a narrow tunnel of hard 45-degree snow called the Two o’ Clock Couloir, embraced on all sides by towering rocks armored in rime ice. The other parties, including a family of skiers from Aspen, followed up the same route.


Two o’ Clock Couloir

The top of the couloir revealed the summit ridge and views unlike any in Colorado. It was the Blanca Group on steroids. Mt. Hood, an ultraprominent peak, offers incomparable scenery in every direction. Mt. Rainier and Mt. Adams rose proudly to the north, while Mt. Jefferson and the Three Sisters were only slightly less impressive to the south. The neutered mound of Mt. Saint Helens was a harsh reminder of the fate awaiting these active volcanoes. 


Summit ridge

After turning around on Liberty Ridge, my chest swelled with the elation of success. I put on my puffy and was soon joined by the other groups, including the Aspenites, who skied from the summit. Bill and James arrived a short while later. Standing at the apex of a mountain like Hood is an awesome personal accomplishment, but it wouldn’t mean nearly as much without friends such as these to share the victory. I spent a few minutes gazing longingly at Rainier, though I didn’t dwell; I was happy where I stood.

We lingered on the summit until about 10 a.m., then started down. A combination of glissades and a good climber’s trail saw as back at the lodge before noon, with beers from Mt. Hood Brewing Company in our hands by 12:30. A toast to success!

Mt. Hood summit

CONCLUSION

As I’ve said, the trip turned out very differently than I’d drawn it up. That doesn’t mean I’d change anything. With a team as strong as the one I had and as hard as I’d trained, I have full confidence I would have made it up Liberty Ridge. But as the cliche goes, the route will always be there. I gained more personal pride in helping a friend in need than I ever would have simply succeeding on a route. People climb mountains for many reasons, and I’ve discovered that I do it mainly for the camaraderie.

More philosophically, before the trip the prospect of succeeding on Liberty Ridge was almost a sad one. It was the last of many adventures I’d planned with Rob. Once it’s done, I have a feeling I’ll be a bit rudderless for a while. As long as Liberty Ridge remains a dream, something on the horizon and not yet behind, maybe I’ll continue to feel this strong connection to my friend. I’m sure I’ll be back one day. That trip will come when it will. Until then, I’ll continue living other dreams, remembering my lost compatriots in other ways and enjoying the friend that remain to me.

Thanks again to the AAC for allowing this journey to happen. I’m truly living my dream.